Seal drafts with EPDM weatherstripping, silicone at casings, and target ≤3–5 ACH50. Upgrade insulation to climate R-values (walls R-13–21, roof R-38–60, floor R-19–30) and align air/vapor layers. Right-size an inverter mini-split via Manual J, add MERV-8/13 filtration, and set smart controls.
Maintain ASHRAE 62.2 ventilation (ERV/HRV) and 35–50% RH. Protect plumbing with ASTM C547 insulation, indoor water heater, and low-temp leak sensors. Size off-grid power for 99% design with 2–3 day autonomy—here’s how to implement it.
Key Takeaways
-
Seal drafts at doors, windows, and skirting with EPDM weatherstripping and silicone; target 3–5 ACH50 to cut heating losses.
-
Upgrade insulation: walls R-13–21, roof R-38–60, floors R-19–30; add exterior foam to break thermal bridges.
-
Install a right-sized inverter mini-split heat pump with smart controls; verify airflow and filtration for efficient, quiet heating.
-
Use balanced ERV/HRV ventilation to maintain 35–50% indoor humidity and prevent condensation while ensuring fresh, safe air.
-
Protect plumbing with insulated pipes, interior water heater placement, and freeze alerts; maintain a 50–55°F setback when away.
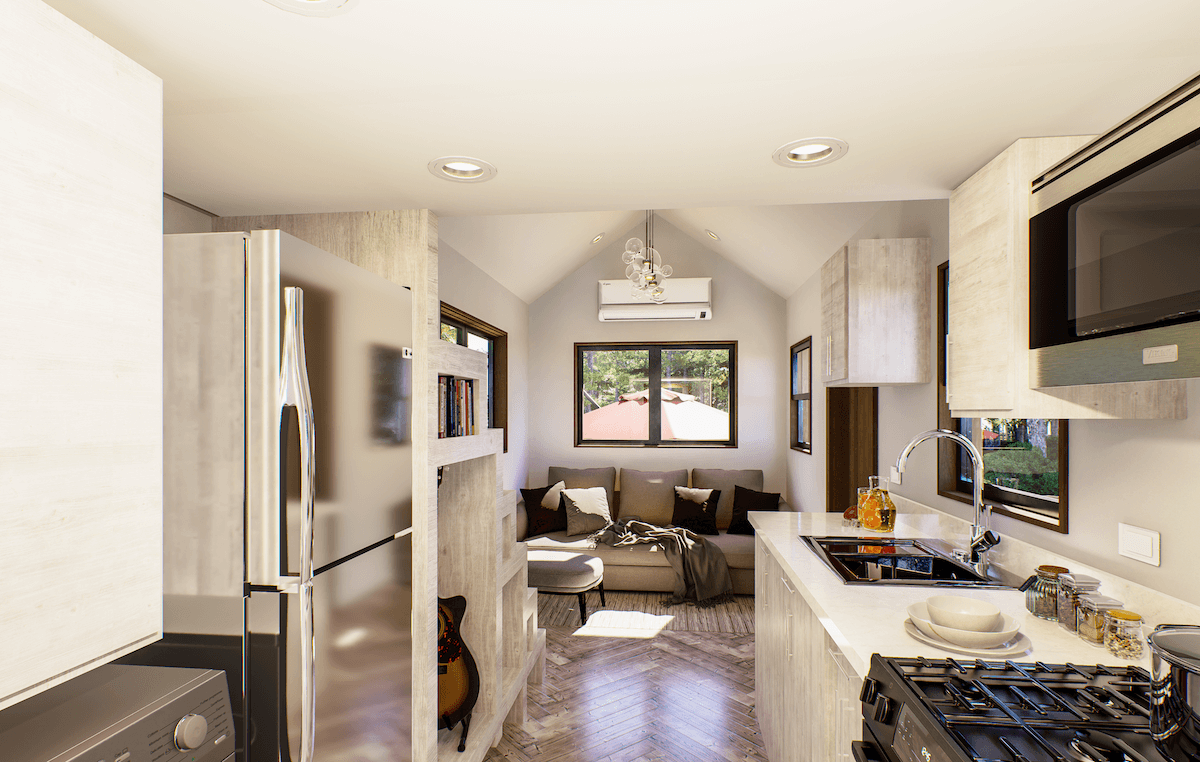
Seal Drafts at Doors, Windows, and Skirting
Although tiny homes have less surface area, air leakage can still account for 20–40% of heating loss, so start by targeting doors, windows, and skirting with proven air-sealing methods. Begin with a blower-door or smoke-pencil check to locate infiltration paths. Install high-density EPDM weatherstripping on door jambs and compression gaskets on operable windows; add door sweeps and draft stoppers to close under-door gaps.
Seal casing-to-wall joints with ASTM C920-compliant silicone; use low-expansion, closed-cell foam around frames. For glazing, apply interior acrylic caulk at trim and exterior butyl tape under flanges. At skirting, create a continuous air barrier: rigid panels with taped seams (ASTM E2357) and sealed penetrations. Verify with pressure diagnostics; target ≤3–5 ACH50 to meet high-performance tiny home benchmarks.

Upgrade Insulation in Walls, Floors, and Roof
Once you’ve controlled air leakage, upgrade thermal resistance so assemblies hit climate-appropriate R-values without moisture risk. Target IECC prescriptive R-values: walls R-13 to R-21, roofs R-38 to R-60, floors R-19 to R-30 (adjust for your climate zone). In 2x4 walls, use dense-pack cellulose or mineral wool; add exterior foam board (R-5 to R-10) to break thermal bridges and raise effective R.
Verify continuous air and vapor control layers align: Class II or smart vapor retarder interior in cold climates; vapor-open exterior. For roofs, vented assemblies need 1:150 ventilation or 1:300 with baffles; unvented roofs require sufficient exterior foam board to keep sheathing above dew point. Underfloors, insulate rim joists carefully. Use radiant barriers only for high-solar-gain roof decks, not as primary insulation.
Optimize Heating Systems for Small Spaces
Before you pick equipment, quantify your load: run a Manual J or ASHRAE heat-loss calc using your upgraded R-values, air-tightness (ACH50), design temps, and internal gains; most well-insulated tiny homes land between 2,000–6,000 Btu/h at 99% design. Size to the design load with 10–15% margin to avoid short cycling. Prioritize inverter mini-split heat pumps (HSPF2/SCOP ≥ 10, low-ambient rating to −15°F) with modulating capacity down to ~1,000 Btu/h. Specify line-set lengths per manufacturer, proper refrigerant charge, and MERV-8/13 filtration.
If you prefer hydronics, a low-mass radiant floor with outdoor-reset and supply temps ≤ 100–110°F improves comfort but demands careful floor R-value and sensor placement. Use sealed-combustion units only. Keep portable heaters as UL-listed, tip-over-protected, GFCI-controlled backups. Install smart thermostats, room-by-room balancing, and verify airflow per ACCA 5.

Harness Passive Solar Gain and Thermal Mass
Even in a tiny footprint, passive solar works when you quantify it and design to numbers. Start by targeting south glazing at 7–12% of conditioned floor area; validate with local solar altitude and obstruction angles. Use high-SHGC glazing (≥0.55) for winter gain, and model hourly profiles with simple degree-day or PHPP-style inputs to avoid overheating.
Add thermal mass to buffer swings: 2–4 lb/ft² of exposed mass (e.g., concrete, adobe, water) per ft² of south glazing is a practical ratio. Place mass within sunlit zones; guarantee surface absorptance ≥0.8 and thickness 1.5–4 in for diurnal storage. Seal air paths to deliver gains into the envelope, then circulate via low-watt fans. Verify performance with dataloggers; target afternoon ΔT storage of 4–8°F.
Choose Energy-Efficient Window Treatments
Window treatments are a controllable R-value. You can raise effective window R-values by selecting assemblies that meet recognized performance metrics. Specify double-cell cellular shades with side tracks; they add roughly R-2.0 to R-4.3 when closed, per lab testing, and reduce U-factor during nighttime setbacks. Choose energy efficient curtains with dense, multilayer fabrics and magnetic or hook-and-loop edge seals to limit infiltration; target air leakage under 0.3 cfm/ft at 50 Pa across the perimeter.
Use low-e thermal window films to cut winter U-factor and reduce SHGC where overheating isn’t desired. Look for NFRC-rated products and verify emissivity ≤0.2. Install interior storm panels with compression gaskets; aim for total window U-factor ≤0.30 Btu/hr·ft²·°F. Add reflective tracks or pelmets to curb convection loops and stack effect.

Manage Moisture, Condensation, and Ventilation
Although tiny homes have small volumes and high occupant-to-area ratios, you can control moisture by quantifying sources and maintaining balanced ventilation to ASHRAE 62.2 levels. Calculate required continuous ventilation (CFM = 0.03 × floor area + 7.5 × number of bedrooms, minimum 15 CFM). Use an HVI-certified, low-sone ERV/HRV to supply/exhaust that rate continuously; verify with a flow hood. Target indoor RH at 35–50% for winter; enable humidity control via hygrometer logging and a dehumidifier with auto-defrost.
Manage condensation risk with moisture barriers on the warm-in-winter side per climate zone and vapor-permeance guidance (Class II or smart vapor retarders). Seal air leaks to 3 ACH50 or better; confirm with blower door testing. Insulate ducts within the envelope. Exhaust point loads: 50+ CFM bath, 100+ CFM kitchen, timed to runtime.
Protect Plumbing and Prevent Frozen Pipes
Because plumbing failures escalate quickly in tiny homes, treat freeze protection as a design-and-operations problem: keep water above 40°F, eliminate stagnation, and control exposure. Start with pipe insulation meeting ASTM C547 or equivalent; target minimum R-3 on interior runs and R-6+ in exterior cavities. Heat-trace vulnerable lines with self-regulating cable listed to UL 515 and wrap per manufacturer spacing. Locate your water heater inside conditioned space; set 120–125°F to maintain distribution temperatures while limiting scale.
Purge dead legs, loop fixtures to maintain circulation, and install check valves to prevent cold backflow. Use frost-proof hose bibbs, insulated skirting, and sealed penetrations around pipes. Add low-temperature leak sensors at sinks and the water heater pan. When away, drain exterior lines and maintain a 50–55°F interior setback.
Improve Air Sealing With Weatherstripping and Caulk
Even minor gaps at doors, operable windows, and service penetrations can add up to 10–25% heating loss, so prioritize air sealing with durable weatherstripping and compatible sealants. Start with a blower-door or DIY pressure test to locate leaks. Specify weatherstripping materials by application: closed-cell foam for irregular jambs, silicone bulb for high-cycle doors, EPDM for wide temperature swings, and pile or silicone fins for sliders. Verify compression set, UL 94 and ASTM D2000 ratings where applicable.
Apply caulking techniques matched to joint movement. Use ASTM C920 Class 25+ elastomeric sealants (silicone or polyurethane) for window perimeters and siding joints; use acrylic-latex only for low-movement trims. Backer rod and 2:1 width-to-depth geometry guarantee durability. Clean, dry, and prime substrates; maintain 40–90°F install temperatures; tool to concave profile.

Use Smart Controls and Zoning to Cut Energy Use
While envelope upgrades cut baseline loads, smart controls and zoning optimize runtime to match occupancy and comfort setpoints. You’ll cut kWh by segmenting your tiny home into heating zones (loft, living, bath) and using smart thermostats with adaptive recovery and geofencing. Target 68°F occupied, 60–62°F setback per ASHRAE comfort guidance; program schedules aligned to your use profile. Pair ductless mini-split heads or electric panels with room-level sensors to avoid short-cycling and stratification.
Implement energy monitoring at the circuit level to verify COP and standby loads, and track runtime hours versus degree-days. Use PID or proportional control where available; set minimum on-times to protect compressors. Seal data-integrated controls with Wi‑Fi fallback and OTA updates. Document setpoints and validate performance weekly with trend logs.
Prepare Off-Grid Power and Backup Heat Options
Although grid power might be reliable most days, you should size and stage off‑grid and backup heat to meet design heat load at your site’s 99% winter design temperature (per ASHRAE Handbook—Fundamentals). Calculate envelope UA, infiltration, and internal gains, then select systems that cover peak BTU/h with N+1 redundancy.
Match solar generators and battery storage to a 2–3 day autonomy target. Use LiFePO4 batteries, 48 V DC bus, and inverter‑chargers with cold‑weather charging profiles. Verify array output using POA irradiance for December and account for snow loss.
Choose sealed, direct‑vent propane heaters with CO/LP detectors, proper clearances, and NFPA 54/58 compliance. Add a catalytic or radiant unit for low-power backup. Maintain fuel with 20–30% reserve, regulator heat, and leak checks. Continuous ventilation is mandatory.
Conclusion
You’ve winterized like a pro by targeting the biggest loads and losses. Seal to ≤3 ACH50 with ASTM E779 testing, upgrade to R-30 floors, R-21+ walls, R-38+ roof, and install low‑U, low‑SHGC windows.
Right‑size heat (Manual J) and use smart zoning to trim kWh/BTU. Add passive solar, thermal mass, and insulated skirting. Protect plumbing to ASHRAE and IPC guidance with heat trace and insulation. Stage off‑grid power and backup heat. Monitor with sensors; verify savings.


Share: