Maximize tiny spaces with vertical ribbon advent calendars clipped with envelopes, magnetic spice-tin countdowns, and felt-pocket tea towels. Try a collapsible pole tree, a taped wall silhouette, or a flat-back hoop wreath with evergreen sprigs and a dried orange slice.
Build modular garlands in 18–36" segments, and craft a tray centerpiece that doubles for hosting. Boost scent with stovetop citrus-clove simmer or rosemary bundles. Pack smart: coil lights on cardboard, bag by length, and label sleeves—there’s more you can use next.
Key Takeaways
-
Create a vertical advent calendar with ribbon and 24 clipped envelopes, filling with activity prompts or tiny ornaments to save surface space.
-
Build a collapsible pole or wall-mounted tree using tape-guided triangles; pack parts in slim, labeled sleeves for easy storage.
-
Make a minimalist wreath with a 10–12" metal hoop, flat-back greens, and a small focal accent to fit narrow doors.
-
Assemble modular garlands in 18–36" segments using paper stars or mini ornaments; attach with mini clothespins for easy swaps.
-
Use smart storage: coil lights on cardboard, nest fragile items in egg cartons, vacuum-bag textiles, and keep a phone inventory to minimize clutter.
Space-Saving Advent Calendar Ideas
Short on space but still want the countdown magic? Try a vertical ribbon strand. Clip 24 tiny envelopes to a 2-inch-wide ribbon; hang the strand on a door knob or cabinet pull.
Next, make a magnetic tin calendar. Fill 24 mini spice tins with notes or treats, label lids 1–24, and stick them to your fridge in a tight grid.
Prefer fabric? Sew (or glue) 24 felt pockets onto a single tea towel; fold it after the holidays.
For ultra-compact storage, use matchboxes. Wrap 24, number them, and stack them in a small shoebox with a lift-out divider.
Add variety: slip in activity prompts (movie night, cocoa walk), tiny ornaments, or puzzle pieces.
Keep hardware minimal: command hooks, mini clips, washi tape, or magnets.
Collapsible and Wall-Mounted Christmas Trees

If floor space is tight or you’re decorating a small room, pivot to collapsible and wall-mounted trees that set up fast and store flat. Choose a style: hinged pole tree, folding ladder tree, or a flat wall silhouette. Measure your wall or corner; mark height and width.
For a collapsible pole tree: assemble a skinny telescoping pole, add lightweight ring tiers, and wrap with garland to form a cone. Attach shatterproof ornaments with clips. Label tiers for quick teardown.
For a wall tree: map a triangle with painter’s tape. Screw in small cup hooks along the outline. String garland or lights in zigzags, then hang ornaments close to the wall. Hide cords with adhesive clips.
Finish by packing components in slim, labeled sleeves.
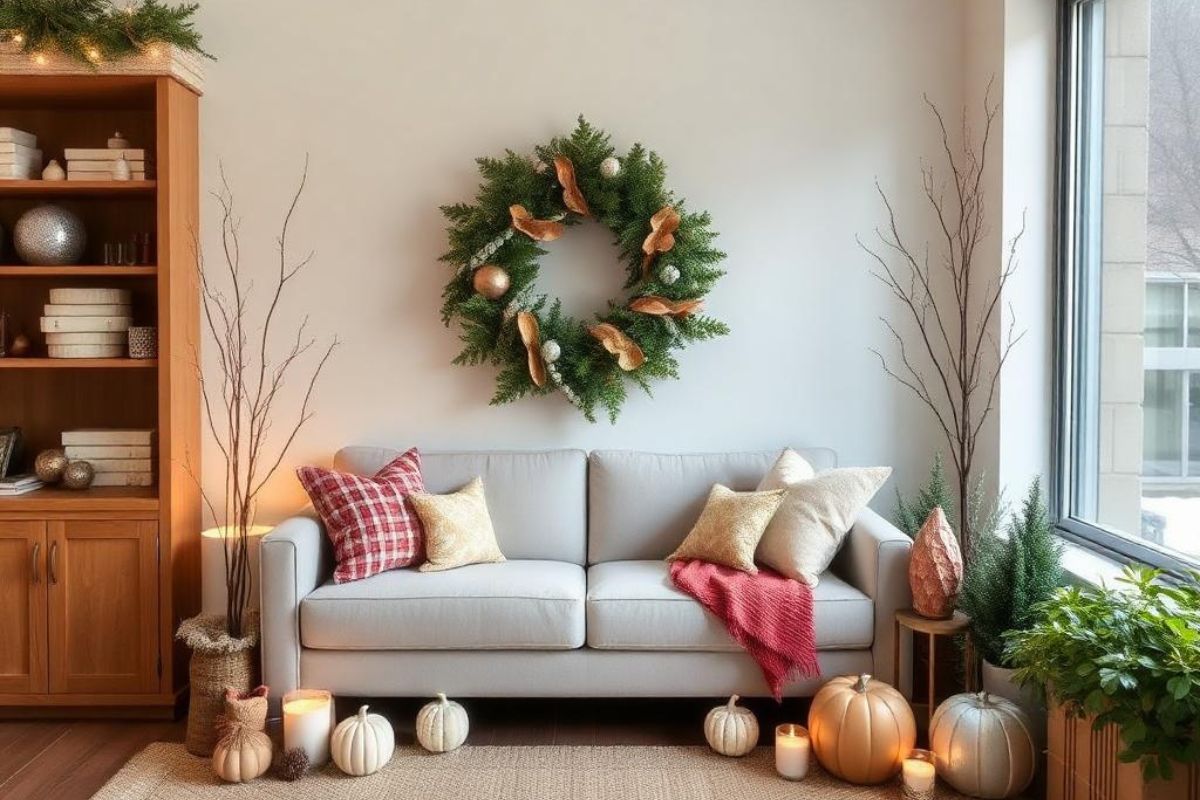
Minimalist Wreaths and Door Decor
Saved floor space with slim trees? Extend that efficiency to your door.
Start with a 10–12" metal hoop or embroidery ring—compact, lightweight. Wrap the bottom third with florist tape. Clip evergreen sprigs to 6–8" lengths; layer them in one direction for a clean silhouette. Wire tightly; trim flyaways. Add one focal: a dried orange slice, mini bell, or bow—keep it small.
Make a flat-back wreath: lay stems so the rear stays flush, preventing wobble on narrow doors. Use a command hook and a thin ribbon loop; measure so the wreath sits eye-height.
Try a minimalist swag: bundle three branches, tie with twine, hang upside down, finish with a single ornament.
Store flat in a garment bag. Refresh greens weekly with a quick mist.
Modular Garlands for Tiny Spaces
Two or three modular garland segments beat one long strand in a small home. Measure key zones—window, shelf, headboard—and set target lengths (18–36 inches).
Pick a base: twine, ribbon, or fishing line. Choose lightweight modules: paper stars, dried citrus, mini ornaments, felt balls, or pine clippings. Keep each segment consistent yet mix colors to link rooms.
Step 1: Cut bases to length and tie end loops for removable hooks.
Step 2: Pre-arrange modules on a tray; aim for even spacing.
Step 3: Attach with mini clothespins or sliding knots for quick swaps.
Step 4: Label a zip bag per segment for flat storage.
Step 5: Hang with clear Command hooks; stagger heights.
Bonus: Create a short “bridge” piece to connect segments for parties.
Multi-Use Tabletop Centerpieces
A smart centerpiece should work hard from breakfast to bedtime, so build a base you can refresh in minutes. Start with a shallow tray that fits your table width. Add a runner under it to define space and catch crumbs. Place two low, stackable bowls inside the tray for easy swaps.
Morning: load one bowl with clementines, the other with wrapped chocolates. Add a small card holder for notes or name tags.
Afternoon: swap fruit for craft supplies—twine, clips, mini clothespins—for quick gift-wrapping at the table. Slide in a tablet stand for recipes.
Evening: replace bowls with lidded jars holding tea lights (battery), and scatter metallic ornaments for sparkle. Clip on a slim ribbon for color.
When guests arrive, lift the tray to clear the table fast.
Scent-Forward Natural Touches

Even if your space is tight, layer scent with small, natural elements that multitask. Start with a simmer pot: add a cup of water to a mini saucepan, then drop in orange peels, a cinnamon stick, and a few cloves. Keep it on low for bursts of fragrance while you’re home.
Next, make herb bundles. Tie rosemary, bay, and dried orange slices with twine; hang one by the door and one near the sink.
Craft quick clove-studded clementines: press whole cloves into a spiral, then set two on a shelf.
Mix a tiny essential-oil spritz: 2 ounces water, 10 drops fir or cedar, 3 drops orange; shake and mist textiles lightly.
Finally, tuck pine cuttings into bud vases for a clean, woodsy note.
Smart Storage and Post-Holiday Packing Tips
Before you pull out boxes, set a staging area and sort décor by zone: tree, mantel, tabletop, lights, soft goods.
Label five bins to match. Work one zone at a time to avoid overflow.
Step 1: Wrap fragile ornaments in tissue, then nest in egg cartons or muffin tins; file vertically in a shoebox.
Step 2: Coil lights around cardboard, tuck ends, and bag by length; label “tree,” “exterior,” “accent.”
Step 3: Stack garlands in zipper bags with silica packets; press out air.
Step 4: Roll fabric items—stockings, runners—into vacuum bags; slide under-bed.
Step 5: Flatten wreaths with a pizza box spacer; hang on a command hook.
Store heaviest bins low, most-used mid, sentimental high. Keep a master inventory on your phone.
Purge duplicates now, not next year.
Conclusion
You’ve got everything you need to deck out a tiny house without clutter. Start by picking one wall-mounted tree and a compact advent calendar. Add a minimalist wreath, then clip on a modular garland in sections. Build a multi-use centerpiece you can shift from table to shelf. Layer natural scents—dried citrus, rosemary, cinnamon sticks. When it’s over, flat-pack, label, and stack by zone. You’ll celebrate big, store small, and reset your space in minutes.

Share: