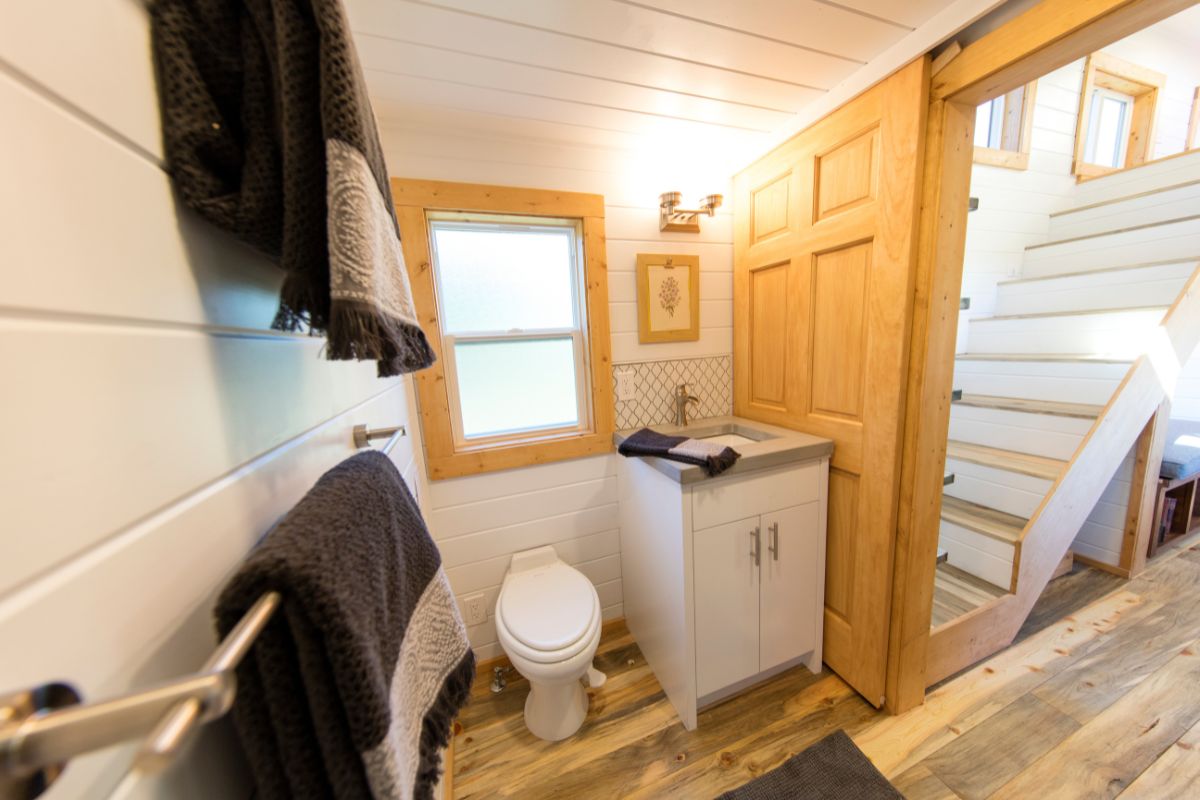
When you’re working with a tiny house bathroom, every inch has to earn its keep. You start with a layout that moves well, then decide if a wet bath will simplify plumbing or if a dry setup fits your routine.
You swap in a pocket door, choose compact fixtures like a corner sink and a vanity with deep drawers, and rely on light colors, large tile, and layered lighting to lift the space. Next, you’ll tackle the overlooked zones that change everything…
Key Takeaways
-
Plan the layout with precise measurements, short plumbing runs, and pocket or outswing doors to reclaim floor space.
-
Consider a wet bath to combine shower and toilet, or a dry bath for easier daily maintenance and less moisture spread.
-
Add built-in storage like recessed niches, mirrored medicine cabinets, and open shelving to keep counters clear.
-
Choose compact fixtures such as corner sinks, wall-hung toilets, and small vanities with deep drawers for efficient storage.
-
Use bright lighting, light colors, and large-format tiles with matching grout to reduce shadows and visually expand the room.
Plan Your Tiny House Bathroom Layout
Before you buy fixtures or pick finishes, map out your tiny house bathroom layout so every inch works hard. Measure wall-to-wall and mark door swing, window placement, and ceiling height.
Place the toilet and shower where plumbing runs stay short, then fit the sink into leftover space. Use a pocket door or outswing door to free floor area. Keep clearances tight but comfortable: leave room to sit, stand, and turn without bumping corners.
Choose wall-mounted or corner fixtures to open the center. Plan storage as part of the layout, not an afterthought—recessed niches, a slim medicine cabinet, and shelving above the toilet.
Add hooks near the entry and a towel bar that doubles as a grab point.

Decide: Wet Bath or Dry Bath?
Most tiny house bathrooms come down to one choice: a wet bath or a dry bath.
In a wet bath, the shower shares the whole room, so you can shrink the footprint and simplify plumbing. You’ll need waterproof walls, a sealed floor, a center drain, and fast ventilation so everything dries quickly. Choose wall-mounted storage and a squeegee routine to keep it crisp.
Pick a dry bath if you want a separate shower zone that keeps the toilet, paper, and towels dry. It costs more space, but it feels calmer and cuts daily wipe-down time. Use a compact shower stall, a narrow vanity, and a clear splash boundary.
Decide based on your cleaning tolerance, moisture control, and how often you shower at home.
Swap In a Pocket or Sliding Door
If your bathroom door steals floor space or blocks a fixture, swap it for a pocket or sliding door to reclaim every inch. A pocket door disappears into the wall, so you can place storage, hooks, or a towel bar where a swing path used to be.
Choose a solid-core slab for privacy and sound control, and add a recessed pull so nothing snags in tight quarters.
If your walls can’t accept a pocket frame, mount a barn-style slider outside the bathroom. Keep the track slim, run it high, and use floor guides to prevent wobble.
Seal gaps with soft-close hardware and a brush sweep to cut noise and drafts. Finish with a simple matte handle and durable paint for easy wipe-downs.
Use a Corner Sink to Open Floor Space
After you’ve reclaimed swing space with a pocket or sliding door, tackle the sink footprint next. A corner sink shifts the basin into unused real estate and clears the main walking path. You’ll gain toe space for turning, drying off, or stepping into the shower without hip-checking fixtures.
Choose a wall-hung corner model to keep the floor visible and easy to wipe. Keep the basin shallow but wide enough for handwashing, and pair it with a short, single-handle faucet to reduce splash.
Run supply lines tight to the wall and use a bottle trap to maintain knee room. Add a slim ledge or corner shelf above for soap and toothbrushes, then mount a small mirror to keep sightlines clean.
Choose a Compact Vanity With Deep Drawers
Even when your bathroom footprint stays tiny, a compact vanity with deep drawers lets you store more without adding visual bulk. You’ll keep essentials close, yet your floor stays clear and easy to clean.
Choose a narrow profile with full-extension slides so you can reach items at the back without digging. Deep drawers beat cabinet doors because you can stack towels, bins, and grooming tools vertically and see everything at once.
Use drawer dividers to separate first-aid, skincare, and hair items, and label slim containers to stop clutter creep. Pick a simple slab front, integrated pull, and light finish to reflect light.
If plumbing steals space, choose a U-shaped drawer or offset sink to preserve storage.
Try a Wall-Hung Toilet (or Composting Option)
A compact vanity handles storage, but the toilet often decides how open the room feels. Choose a wall-hung model to free up floor space and let you see more continuous flooring, which makes the room read larger.
You’ll mount the bowl to a sturdy in-wall carrier, then hide the tank in the wall so only clean lines remain. Cleaning gets faster because you can mop straight underneath.
If plumbing runs or weight limits make that tough, consider a compact composting toilet. You’ll skip a black-water tank and reduce water use to zero, which suits off-grid builds.
Just plan a vent route, leave access for the solids bin, and keep a small sealed caddy for cover material.
Install a Compact Shower With a Glass Door
When you’re working with a few square feet, swap the tub for a compact shower and close it with a clear glass door to keep sightlines open.
Glass reads lighter than curtains or frosted panels, so the room feels wider and brighter. Choose a neo-angle, corner, or 32-inch square base to reclaim floor space for circulation.
Go with a sliding or pivot door that won’t clash with the vanity or toilet swing. Keep hardware minimal: a single handle, slim hinges, and a low-profile threshold for easy stepping in.
Match the door trim to your faucet finish so the space looks intentional, not busy. If privacy matters, add a removable film strip at eye level instead of switching to opaque glass.
You’ll get a clean, open footprint without sacrificing comfort.
Waterproof Smart: Niches, Panels, Wet-Bath Tricks
Clear glass keeps the shower visually open, but waterproofing does the real work in a tiny bath. Treat the whole room like a wet zone: slope the floor to a single drain, run membrane up the walls, and seal every corner with tape and compatible sealant.
Use large-format panels or continuous sheet goods to cut grout lines, speed cleaning, and reduce leak points. Choose a shower base with an integrated flange, then overlap wall membranes for a shingle effect.
Add a collapsible water dam or low threshold if you need to keep spray off the door. Pick a wall-hung toilet and a compact vanity with sealed edges so mop-up takes seconds.
Finish with a quiet, timed exhaust fan to dry fast.
Build Storage Into the Walls (Recessed Niches)
Although floor space is scarce, you can steal storage from the walls with recessed niches that hold soap, shampoo, and spare rolls without adding bulk.
Place one in the shower at chest height, another near the toilet, and keep everything within reach without cluttering ledges. Frame between studs when possible; if plumbing blocks the bay, build a shallow niche and limit depth to what you’ll actually store.
Line it with waterproof backer, slope the base slightly, and wrap it in the same tile so it disappears. Add a slim curb or metal edge to stop bottles from tipping.
Use a single, warm LED strip or puck light to brighten the cavity and find items fast. Keep the niche count low for a calm wall.
Add Open Shelving That Stays Lightweight
If you keep it airy, open shelving gives you daily storage without making a tiny bathroom feel boxed in.
Mount one or two slim shelves above the toilet, beside the vanity, or over the door to use dead wall space. Choose thin wood, powder-coated metal, or clear acrylic so the visual weight stays low.
Keep depth shallow (4–6 inches) to prevent bumps and clutter. Group items in small trays so you can wipe down fast and move everything at once.
Stick to a tight palette: matching bottles, folded towels, and a single basket for backups. Leave at least a third of each shelf empty to preserve breathing room.
Use simple brackets and align edges for clean lines.
Use a Mirrored Medicine Cabinet for Hidden Storage
Because every inch has to earn its keep, a mirrored medicine cabinet gives you storage without adding bulk.
Mount it over the sink to double as your main mirror while tucking daily essentials out of sight. Choose a shallow, recessed model if your wall allows it; you’ll keep the face flush and avoid bumping elbows in tight aisles.
Inside, use adjustable shelves to group items by height, and add small bins so bottles don’t tip. Store backups and less-used gear up high, and keep your daily kit at eye level for fast routines.
Pick a rust-resistant finish and soft-close hinges to cut noise. You’ll keep counters clear and the room calm.
Use Layered Lighting to Eliminate Shadows
When your bathroom lighting comes from a single ceiling fixture, shadows land right where you need clarity—at the mirror, sink, and shower. Fix that by layering light in three tight zones.
Add a slim, damp-rated mirror bar or two vertical sconces at face height to stop under-eye shadows while you shave or apply skincare. Pair it with a small ceiling downlight for overall fill, then add a targeted shower light so corners don’t disappear behind steam.
Put each layer on separate switches, or use a two-channel dimmer, so you can run only what you need. Choose low-profile LEDs, warm-neutral (around 3000K), and a high CRI for accurate grooming.
You’ll see better and waste less space.
Stick to Light Colors (With One Bold Accent)
Although dark walls can look dramatic, they shrink a tiny bathroom fast, so keep your base palette light—soft white, pale greige, or light sand on walls, tile, and ceiling—to bounce light and make the room read larger.
Carry that color onto trim, grout, and even your shower curtain to reduce visual breaks and keep lines clean.
Choose one bold accent to add focus without clutter: a matte-black faucet set, a deep navy vanity front, or a single framed print.
Repeat that accent once more—hooks, a towel, or a soap pump—so it feels intentional, not busy.
Keep finishes consistent, limit patterns, and store colorful products out of sight so the calm, bright shell does the heavy lifting.

Use Large-Format Tile to Look Bigger
Light colors set the stage, but tile choice controls how broken up the room feels.
Go large-format on floors and shower walls to reduce grout lines and visual noise. Fewer seams read as one continuous plane, so the bathroom feels wider and calmer.
Choose rectangular tiles and run them lengthwise to pull the eye down the longest dimension. Keep grout close to the tile color, and pick a matte finish for slip resistance without busy shine.
If you can, wrap the same tile from floor into the shower to erase boundaries. Use a simple stacked or straight lay; complex patterns shrink space fast.
Finish edges with slim trims, not thick borders. Clean lines win.
Add Hooks, Racks, and Multipurpose Caddies in Dead Zones
Three overlooked zones—behind the door, beside the vanity, and along the shower edge—can carry most of your daily essentials if you outfit them with hooks, slim racks, and multipurpose caddies.
Mount two or three staggered hooks for towels and robes, and you’ll keep fabrics off the floor without adding bulk.
Add a narrow vertical rack next to the vanity for spare rolls, a hair tool, or a small hamper bag.
Inside the shower, swap a corner shelf for a tension caddy or adhesive baskets so bottles don’t crowd the ledge.
Choose pieces with drain holes, rustproof finishes, and removable bins so you can wipe fast.
Keep only what you use weekly, and you’ll free every surface.
Conclusion
You don’t need a big footprint to get a bathroom that works hard. Plan your layout first, then choose wet or dry based on how you live. Swap in a pocket or sliding door, and reclaim floor space with a corner sink and a compact vanity with deep drawers. Layer your lighting to cut shadows, keep colors light with one bold hit, and use large-format tile. Finish by loading dead zones with hooks and caddies.
Share: