A tiny house can change in a single weekend. Walls move. Wires appear. Cabinets go in.
If you do not record the middle steps, you lose the story and you also lose the facts that help you fix problems later.
A calm record makes planning easier. It helps you explain choices to a partner or a contractor. It also adds trust when you sell.
Set up your project folder
Organizing everything becomes crucial, especially when you’re into photography and videography. There are so many files that if you don’t organize, it’ll start haunting you. Trust me, telling you with experience.
You should create a single project folder with weekly subfolders in CapCut. Inside each week keep one folder for photos and one folder for video. Name files with the date, the room, and the angle. A simple name works well. For example, 2025 09 03 Kitchen Corner A Before.
This habit is boring on day one and priceless on day sixty. Turn on CapCut Cloud so the same folders and names stay in sync across phone and desktop.

Do a calm baseline day
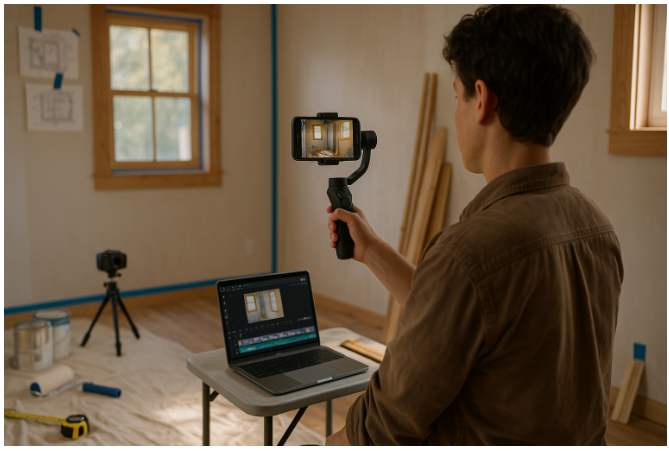
Before you remove anything, record a slow walkthrough outside and inside. Hold your phone at chest height. Tap to focus. Pan across each wall and the ceiling. Pause for a breath before you stop recording so the last frame is steady. Take still photos from the same corners.
Open cabinets and look under sinks. If you already see a soft floor, a stain, or a loose joint, give it a few extra seconds. This first day becomes your control shot for the whole build.
Drop this day into a new CapCut project and label it Baseline so you can compare weeks side by side.
Fix two camera spots for the whole project
Pick two corners that show the most change. Mark the floor with a small piece of tape. Note the height of the phone in your notes app. Return to these spots at the start and at the end of each work day. The same angle turns a pile of clips into a clear time story. It also keeps you honest.
Crooked lines cannot hide when the view never changes. Save a still frame from each corner in CapCut and pin it at the top of your timeline as a reference image.
Use a simple end of day routine
After you finish a work session, follow the same short path. First, record wide shots from your two fixed corners. Then record a few mid shots of the work that changed today. Finish with close ups of details you might forget. Show the path of a cable. Show a pipe joint. Show a fastener size.
Say one clear line on camera that explains the change. For example, the kitchen south wall outlet moved twenty centimeters to clear the drawer slide. If you feel tired, do the two wides and one detail that tells today’s story. The routine is what matters.
Make a simple CapCut project preset with an order wide then mid then detail so you can drop clips in fast.
Capture hidden work before it disappears
The work you cannot see later is the work that can cost you time and money. When you run wire, film a slow sweep before you close the wall. Keep a tape measure in the frame. Place a note card with the location and the height.
For example, Bath north wall, valve center one hundred ten centimeters, hot on the left. Do the same for insulation, vapor barrier, blocking for shelves, and any access panels. If you splice anything, record the box, the connector, and the label.
Add a quick text overlay in CapCut with the same note so the info lives inside the clip.
Make a weekly time lapse

Once a week, set your phone in a safe corner and let it watch while you tackle a big task like insulation or wall panels or cabinet install.
Lock focus and exposure if your app allows it. Dust or low light can make the picture look soft. You can improve the final edit with CapCut’s ai video upscaler.
Edit the time lapse in CapCut with Speed or Speed curve so hours shrink into seconds.
Record your voice and your notes

Audio makes your progress easy to follow. After cleanup, find a quiet spot.
Record a short voice note. Say what changed. Say what went wrong. Say what you will do next. If you want a steady and clean narration track for your weekly video, create it with CapCut’s ai voice generator.
If you prefer to write, type your notes and turn them into audio with CapCut’s text to speech ai. Turn on CapCut Auto Captions and Noise Reduction so words are clear even if the room had a bit of echo.
Use phone basics that keep everything clean
Turn on the grid so your horizontals stay level. Tap to focus. If a bright window tricks the exposure, point the camera at a mid tone wall, lock exposure if you can, then reframe. Move slowly. Count one Mississippi during a pan.
Hold the shot for a breath before you stop recording. Film in landscape for your archive unless you are making a vertical reel on purpose. If the light is mixed, pick one light source and stick with it. If a clip tilts or shakes, use CapCut Crop and Stabilize to clean it up.
Keep a decision log that explains the why
Images tell you what changed. A decision log tells you why it changed. Keep a running note with dates and short lines. Raised the loft rail to ninety five centimeters after the test lean felt unsafe. Moved shower niche to clear stud. Rerouted PEX to avoid vent. Added access panel behind stove.
These lines become your narration and your memory. Drop markers on the CapCut timeline at each key decision and name them so you can jump back fast.
Label and back up without fail
Turn on a cloud backup that syncs by itself. Once a week copy new folders to a small portable drive. Keep the drive in a safe place. If your phone breaks, your record stays safe.
If you share the project, give your partner view access to the weekly folders so everyone talks about the same source of truth. CapCut Cloud keeps your edits and media linked so you can switch devices without losing work.
Measure inside the picture
When you measure, keep the tape in the frame. If you move a stud or set blocking, record the measurement and also say it out loud.
For example, Blocking forty centimeters above the counter for future rail. Later you can find this clip faster than any sketch.
Add a small text label in CapCut with the number and location so it is readable at a glance.
Tell one short story every week
Keep the weekly recap close to two minutes. Start with a before clip from Corner A. Show a handful of detail clips from the work that mattered most.
End with an after clip from the same corner. Add your narration. Mention one lesson and one plan for next week. This simple rhythm gives your build a steady heartbeat.
Use a clean CapCut Template for your opener and close, then add Auto Captions so viewers can follow without sound.
Be kind and clear with people on camera
Ask friends and tradespeople if they are comfortable appearing in your record. Some do not want their faces online. Blur a logo if someone asks. If a brand sends a tool or a material, label that fact. If you follow a detail from another builder, credit them.
This builds trust and helps others find good methods. Use CapCut Mosaic or Face Blur to cover faces or logos when needed.
Fix common problems with simple steps
If you see flicker, lock exposure or switch off mixed lighting. If corners look bent, step back and avoid the ultra wide lens. If wind ruins your audio, record narration indoors after you finish.
If you miss a day, do not fake it. Acknowledge the gap and keep moving. Honest records are stronger than perfect ones.
In CapCut you can Stabilize shaky shots, use Adjust for exposure, and use Noise Reduction on rough audio.
Plan the next week so you do not forget key shots
On Sunday night, make a short shot list for the days ahead. Ladder mockup. Shower valve depth. Cabinet scribe. Reading light cable runs. Time lapse during wall panels. When the week gets busy, the list pulls you back to the camera. Make a simple title card in CapCut with this list and place it as the first clip so you stay on plan.
Keep safety in the story
Show a respirator when you stand. Show gloves when you handle insulation. Show eye protection when you cut. This is not for show. It proves you take care of yourself and your space. It also helps others copy safe habits. Add a quick safety card in CapCut on days with cutting or spray so the message is clear.
Build the final story when the dust settles
When the project ends, pull every fixed corner clip from week one to the final clean room. Place them in order on a timeline. Watch how the space fills and calms down. Add a few detailed clips that mark turning points. The day you found a hidden leak.
The moment the first cabinet hung true. The last hinge tweak that made the doors line up. Lay your narration on top and keep the pace relaxed.
Let the work speak for itself. Build one master edit in CapCut, match cut your beats with markers, balance color with Adjust, and export at the highest quality your footage supports.
Why this record still helps after move in
If a window leaks, your record shows the flashing steps. If a switch fails, your record shows the wire path. If you decide to sell, buyers trust a home with a clear history.
If a friend asks for help, you can show more than you can tell. Your tiny house will not only be a home. It will also be a clear and useful story that you can return to any time. Keep your CapCut project files with the media so you can reopen and pull proof fast.
The simple loop to follow
Stand in the same two spots. Speak your decisions while they are fresh. Keep your files tidy. Make a short recap each week. You do not need special gear.
You need a calm routine that you repeat. With that routine, your progress will be easy to follow and easy to share.
Duplicate last week’s CapCut project and replace the clips so the structure stays the same and editing stays calm


Share: